
Ping Test for Network Connectivity: Simple How-To-Guide
Last updated
Reliable network connectivity is paramount for uninterrupted communication and efficient data transmission. The ping test is a valuable tool to assess network connectivity, identify potential issues, and troubleshoot them effectively.
If you're seeking to troubleshoot network issues or test connectivity between hosts, this comprehensive guide offers step-by-step instructions and valuable insights for performing an effective ping command test.
What Ping Command Is and How It Works?
The ping (Packet InterNet Groper) command is a widely used and supported network troubleshooting utility. It can run on almost any operating system, from Windows, Mac, and Linux to switches, routers, and firewalls.
ICMP tool (Internet Control Message Protocol) tests the connectivity between two nodes.
The term "ping" originates from SONAR, which uses ultrasonic waves to emit signals and detect their echoes bouncing back from objects.
Ping works in a similar fashion:
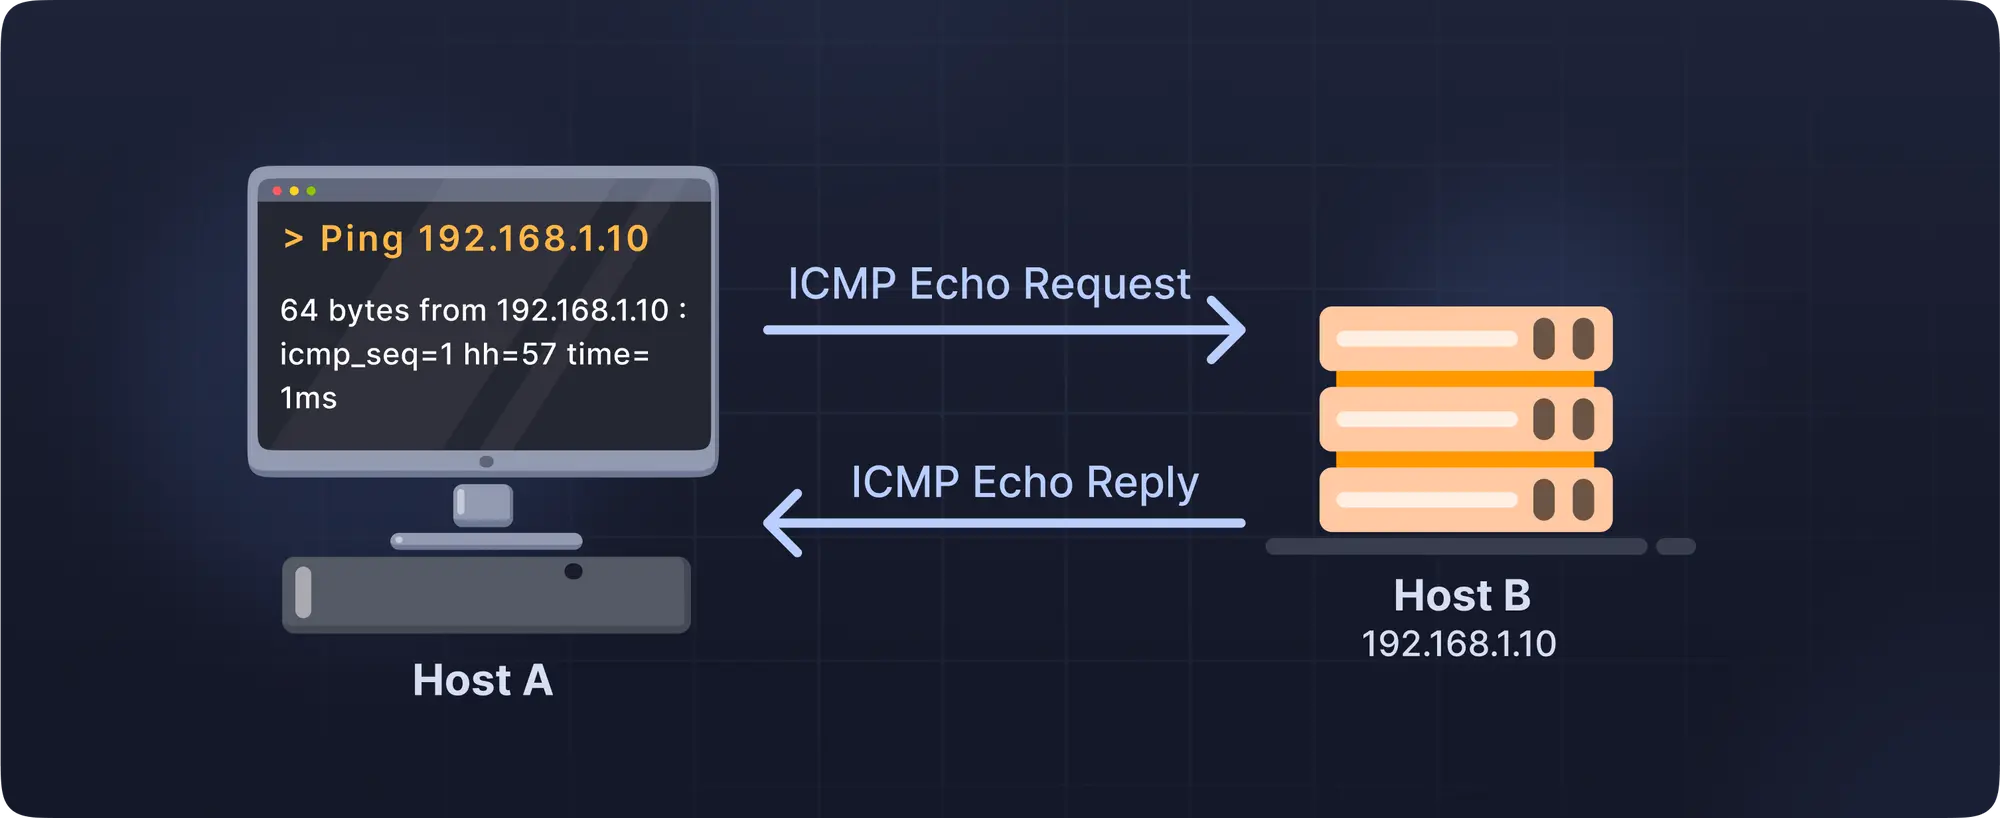
For instance, there are two hosts- host A and host B.
If we type “ping <ip address>”(ip of host B) from host A, an echo request will be sent to host B.
Syntax will be:
ping 192.11.22.22. (Consider 192.11.22.22 as host B’s ip address)
Whether host B is located in host A's local network or a different network, it doesn't affect our ability to ping host B. This is because ping is publicly rootable, allowing us to reach the destination regardless of the network location.
Host B acknowledges the request through an echo reply when it receives an echo request.
By default, Windows will send four echo requests at once. If one or two packets get lost, we can still see if the host responds by sending and receiving a successful ping.
The ping function makes it simple to quickly determine whether a system is online and capable of communicating with other computers or network devices.
Ping has other features like:
- Testing network connections.
- Fixing network interface cards
- Testing the DNS name's ability to solve issues
Let’s understand how a ping command works in different operating systems.
Guide to Running a Ping Test in Simple Steps
To quickly verify basic network connectivity to a machine with the hostname server B or IP address 192.11.22.22, type the following:
# ping serverB OR # ping 192.11.22.22
To test the local TCP/IP stack, use either the localhost hostname or a loopback address, enter the following command:
# ping localhost # ping 127.0.0.1
You may also use the ping 0 command to ping localhost:
# ping 0
How to Perform a Network Ping Test in Windows
- In Windows, the ping test command works as follows:
- Go to the taskbar→Search option
- Open the Command Prompt by typing "cmd".
- A command prompt will be launched. Type "ping" and press the space and ip address. (Enter the IP address you want to ping, for instance, 192.168.11.22)
- Examine the ping results.
How to Ping on a Mac OS & Linux
- Go to the Applications folder on your Mac and find the Utilities folder. Open the 'Utilities' folder and find the Terminal tab.
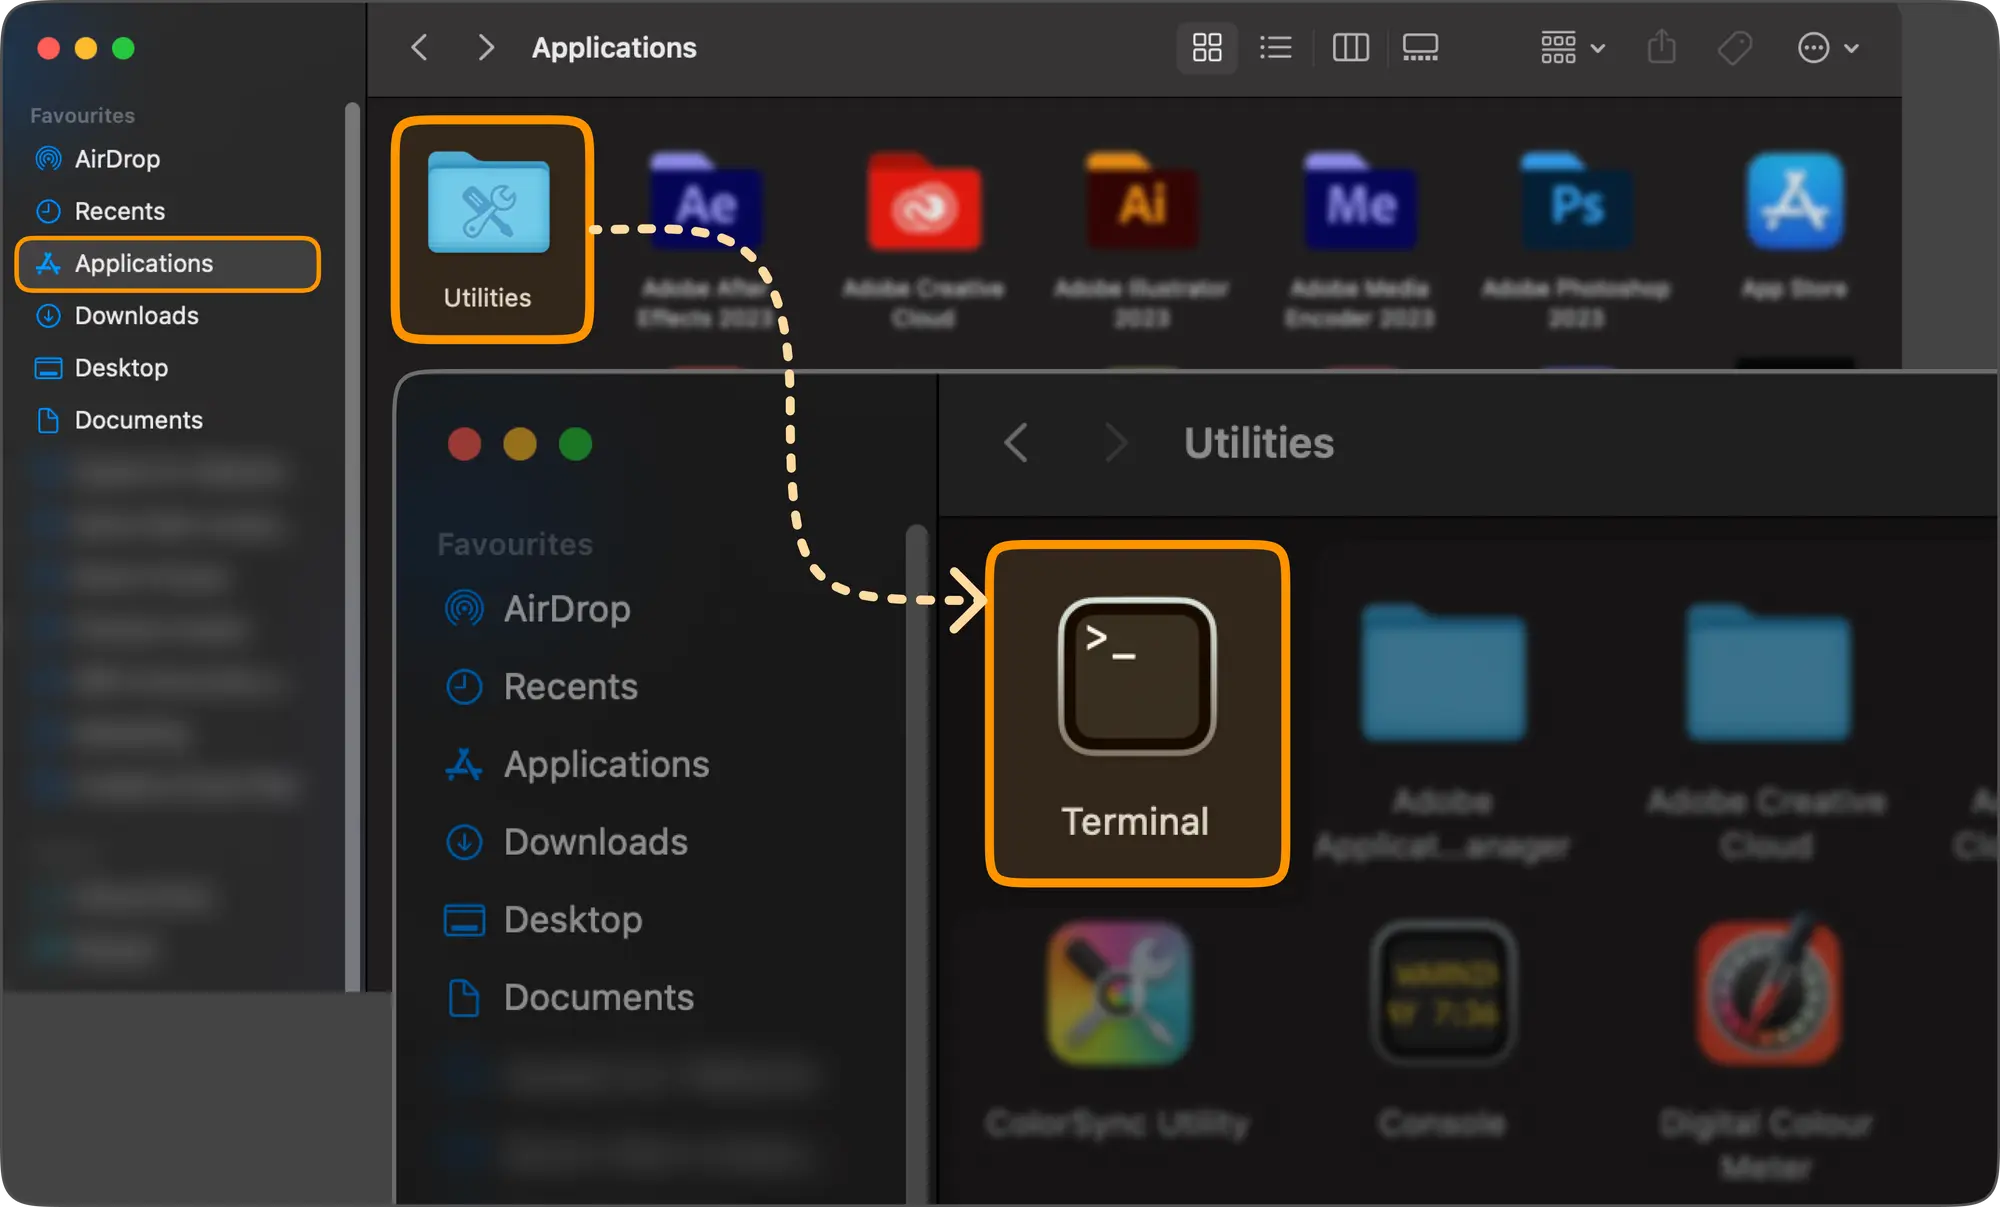
- Select the Terminal tab, where you can initiate the ping test.
- Enter the domain name or IP address you want to check in the designated field. You can test connectivity with a specific website or server.
- The Network Utility will send the specified number of pings to the target address and display the results in the window.
Performing a Ping Test in Linux: Step-by-Step Guide
- Open a Terminal window or press Ctrl + Alt + T to open a Terminal window.
- Press "Enter" after entering the following command into the Terminal window:
ping -c 10 hostname - Replace "hostname" with the domain name or IP address you want to ping.
- The '-c' flag specifies the number of pings to send (in this case, 10).
- The Terminal will display the ping results, showing the round-trip time for each packet sent to the specified domain or IP address.

Ping Test Results: What They Mean and Why They Matter
Completing the necessary steps is a crucial part of any process, but it's equally essential to understand and derive insights from the results.
Here's what you need to know after entering the ping command:
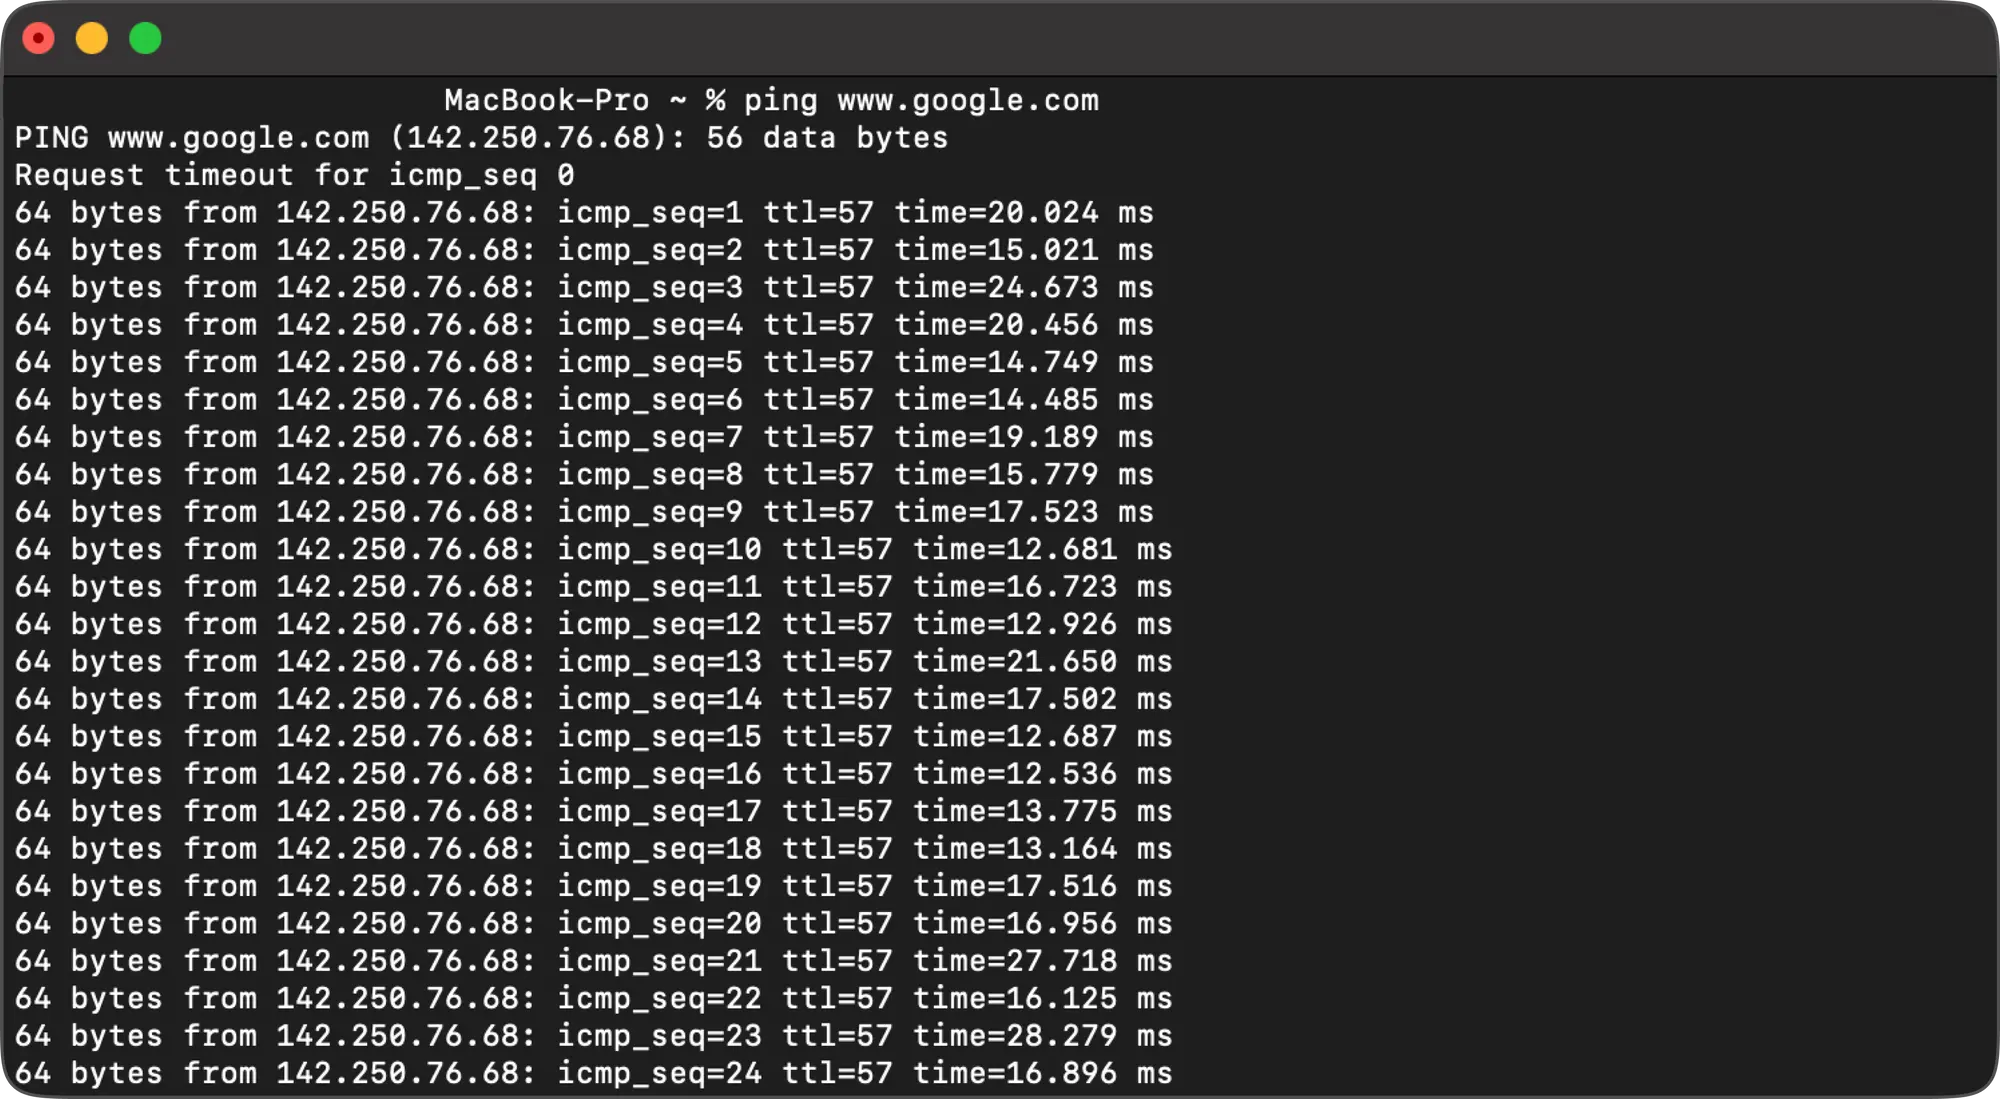
Host Name Confirmation: The first line of the ping results displays the server's hostname, confirming an active connection to the server.
Bytes Sent to the Server: The number of bytes sent to the server is typically shown as 32/64. This indicates the amount of data being transmitted.
Response Time Indicators: The next four lines reveal the response time from the server. It shows the number of bytes sent back and the time taken for the response to return, measured in milliseconds.
TTL (Time to Live): TTL represents the total number of routers the packet will traverse before reaching its destination. This information provides insights into the network path the packet takes.
Request Timed Out Error: If you encounter the "request timed out" message, it indicates that the packets couldn't locate the host, highlighting a connection problem.
Ping Statistics: This section presents overall statistics for the ping test. It includes the number of packets sent and received and any packet loss. Packet loss suggests a connection issue.
Approximate Round Trip Times: The approximate round trip times reflect the connection's speed. Higher times indicate a poorer connection quality.
Benefits of Ping Test
Ping tests offer a myriad of advantages for individuals and businesses invested in optimizing network performance and enhancing user experience.
Here are some key benefits of using a ping test:
Diagnosing Network Issues with Precision:
- Swiftly identifying connectivity snags: Ping tests quickly determine if your device can reach a website or server, pinpointing issues like internet outages, faulty cables, or malfunctioning routers.
- Isolating performance bottlenecks: Ping tests reveal the underlying reasons for network slowness, exposing potential causes like overloaded routers, congested pathways, or distant servers by tracking data packet delays or losses.
- Troubleshooting connection woes: When online services or applications act up, a ping test can reveal whether the problem lies with your network connection or the service itself.
Measuring Network Performance for Optimized Usage:
- Assessing latency: Ping measures the round-trip time for data to travel between your device and a server, providing a clear picture of network latency. This is crucial for online gaming, video conferencing, and real-time applications.
- Monitoring network health proactively: Regularly running ping tests helps track changes in performance over time, allowing you to identify and address potential issues before they significantly impact users.
- Comparing connection options for informed decisions: Ping tests enable you to evaluate and compare the performance of different internet service providers or Wi-Fi networks, providing the insights needed for informed decision-making towards achieving optimal connectivity.
Boosting User Experience through Proactive Network Management:
- Preventing disruptions before they occur: Through early detection of network issues, ping tests assist in proactively preventing service disruptions and mitigating potential frustrating user experiences, both for your organization and your customers.
- Optimizing network resources for efficient allocation: Understanding network performance allows you to prioritize bandwidth allocation and optimize resource usage for critical applications, ensuring smooth operation.
- Enabling seamless communication: Low latency and reliable connections are essential for smooth online communication, whether it's video calls, online meetings, or collaborative work.
Simple and Easy to Use:
- Widely available on operating systems: Ping is a built-in tool, readily accessible without installing additional software.
- User-friendly interface: Running a ping test is straightforward, even for non-technical users, with clear results displayed in milliseconds.
- Fast and efficient: It is quick and lightweight, offering immediate insights into your network connection without consuming significant resources.
Common Ping Errors and How to Troubleshoot Them
- Request Timed Out Error: If you encounter the "request timed out" message, it indicates that the packets couldn't locate the host, highlighting a connection problem. In this case, the system you're trying to reach doesn't exist, isn't powered on, or isn't connected to the network.
- Firewall: Another reason the system may not respond is the firewall.Depending on the port number and IP address, firewalls can be set up to allow or prohibit traffic. This might be blocked because ping could be used for observation by an attacker.
- Destination Host Unreachable: This error indicates that the route to the destination host cannot be found. This could be from the local host or the default gateway. To resolve this issue, check your ip settings and default gateway address.
- Ping could not find the host: This error means that the computer could not resolve the hostname to the ip address indicating a potential DNS server issue.
Apart from the above errors, there are times when you might face packet data loss, which means few requests are getting a reply while few are not.
There are a number of potential causes, including:
- Broken network cards
- Broken cables
- Problem with the switches or routers.
Other Applications to test Ping
Apart from testing connectivity, you can use ping in the following ways:
Continuous Ping:
Go beyond occasional tests and run ping continuously to maintain a constant influx of network information.
In Linux, use CTRL + C to stop the process, while in Windows, type "ping -t" in the Command Prompt for endless pinging.
You gain real-time visibility into network performance, stability, and potential issues by running ping continuously, enabling proactive troubleshooting.
Linux Persistence:
Utilize the persistent ping session feature of the Linux ping application to keep up continuous monitoring and data gathering.
Network Optimization:
Ping data can be analyzed to find latency, packet loss, or connectivity issues so you can improve network setups for performance.
Automation Tools:
Explore third-party solutions that automate ping testing so you can keep an eye on numerous hosts at once and produce in-depth reports for more in-depth research.
General FAQs for Ping Command
What are some alternative ways to test connectivity besides using ping?
Compared to ping, the traceroute tool offers considerably more in-depth details about a connection to a remote site. Information about each "hop" a packet makes from your computer to the remote host is shown by the programme traceroute (or tracert on Microsoft Windows systems).How can I perform a ping test on my network?
First step is to open the command prompt. In the search box, type "cmd" to launch the Command Prompt. Here’s how to ping an ip_address Type "pingIs it possible to determine network speed with ping command?
Yes. The ping command is one of the measurements of how quickly you can request and receive data and the variability in responseWhat is the process for pinging an IP address?
Open the Command Prompt, by typing "cmd." Launch the Command Prompt. In the text field, enter "pingHow do I ping an IP address using DNS?
Select Start. Enter "cmd" in the Open area, then hit OK. Enter the command "ping (IP address)" or a hostname (such as "ping google.com") or IP address of the preferred DNS server. Check for a response that for example might read, "Reply from 192. 12.21.5."Can I use ping to test connectivity with another network?
Yes, you can test connectivity with another network with the ping command. You can evaluate the connectivity between your network and the target network by providing the IP address or domain name of a device or server in another network.What is the ping command in cmd used for?
The most common TCP/IP command used to diagnose connectivity, reachability, and name resolution issues is ping. You can test the computer's IP address and name with this command.What does ping stand for in networking?
Ping, short for Packet Internet or Inter-Network Groper, is a basic Internet program used to test and verify the existence and accessibility of a specific destination IP address.
Anjali Udasi
As a technical writer, I love simplifying technical terms and write on latest technologies.
